Installing Mono framework and MonoDevelop IDE on Ubuntu 18.0.4

I’m exploring a lot on .NET cross platform development these days. One of the option other than .NET core, is to leverage Mono framework. Mono framework and MonoDevelop IDE also helps us to develop cross-platfrom .NET applications.  Here are the steps i followed to set up Mono framework and MonoDevelop IDE on Ubuntu 18.0.4.

a)Set up mono repository for ubuntu 18.0.4

sudo apt-key adv –keyserver hkp://keyserver.ubuntu.com:80 –recv-keys 3FA7E0328081BFF6A14DA29AA6A19B38D3D831EF

 
echodeb https://download.mono-project.com/repo/ubuntu stable-bionic main” | sudo tee /etc/apt/sources.list.d/mono-official-stable.list

sudo apt update

b)Install required packages

Install the package mono-devel to compile the code.
sudo apt install mono-devel

Install the package mono-complete to install everything.
sudo apt install mono-complete

Install the package mono-dbg to get the debugging symbols for framework libraries.
sudo apt install mono-dbg

Install package referenceassemblies-pcl for PCL compilation support (this gets installed if your install mono-complete).
sudo apt install referenceassemblies-pcl

Install package ca-certificates-mono to get SSL certificates for https connection (this gets installed if your install mono-complete).

sudo apt install ca-certificates-mono

Install pakage mono-xsp4 to run ASP.NET applications.
sudo apt install mono-xsp4

c)Install monodevelop IDE

The pre-requisite for installing MonoDevelop IDE is to set up the  mono repository for ubuntu 18.0.4 (mentioned in step #a). Then proceeed to IDE installation using apt-get package manager.

sudo apt-get install monodevelop


How to SSH into virtual box guest VM from host

I have set up a virtual box guest VM running ubuntu 18.0.4. I tried to SSH into the ubuntu guest VM from host. It did not work. Here are the simple steps to enable SSH to access ubuntu guest VM from host.

By default, when we create a virtual machine in virtual box, it will come up with a pre-configured NAT adapter.

virtualbox NAT

This will provide the internet connection to the guest VM. This is not enough for enabling SSH. Power off the virutal machine, open network settings in virtual box and add a host only adapter.

Host only adapter

Go to File –> Host Network Manager  and make sure that the selected network adapter for host only network is enabled with DHCP configuration.

DHCP1

DHCP2

The virtual machine that is configured with this Host only network adapter can receive static ip addresses in the range of lower bound and upper bound mentioned in this configuration. In this  case, it is between 192.168.57.3 and 192.168.57.254 (both bounds inclusive).

Switch on the virtual machine and log in.

We need to make changes to the network interfaces file of ubuntu, to reflect the host only adapter and the static ip for the VM.

Navigate to /etc/network/interfaces and add the following lines.

auto enp0s8
iface enp0s8 inet static
address 192.168.57.3
netmask 255.255.255.0

In mycase the host only network adapter is assigned as enp0s8 in the guest VM. In your case, it may be same or different. Based on that set it appropriately.

The next step is to install the openssh server. Run the following commands in the terminal.

auto eth1
iface eth1 inet static
address 192.168.57.4
netmask 255.255.255.0

Restart VM and we can the static IP address of 192.168.57.4 assigned to it.

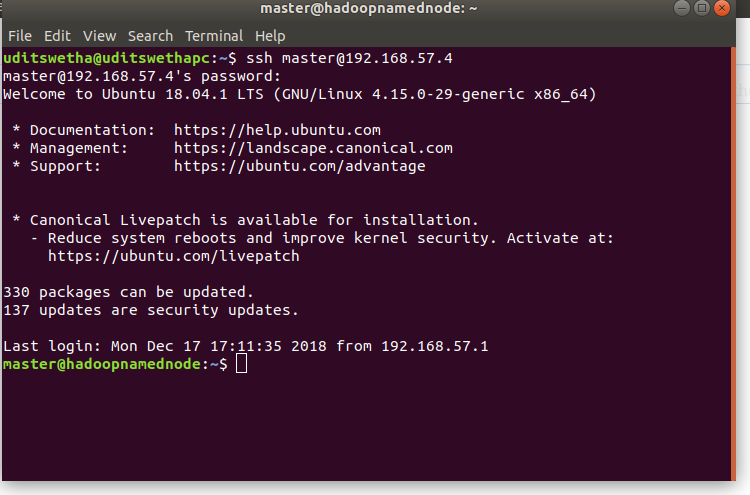
SSH from host. It should be successful.

SSH guest VM

This completes the post of enabling SSH for ubuntu 18.04 guest VM running in virtual machine.

Docker error response from daemon client.Timeout exceeded

I was trying to set up Docker in my machine running ubuntu 18.0.4. I got this error “Error response from daemon: Get https://registry-1.docker.io/v2/: net/http: request canceled while waiting for connection (Client.Timeout exceeded while awaiting headers)”, while issuing ‘Docker login’ command from the terminal.

Screenshot from 2018-12-25 13-05-10.png

I have learnt that the fix for this issue is to add couple of more entires in the resolve.conf file.

Navigate to /etc/resolv.conf

Add the following nameserver entries

nameserver 8.8.8.8

nameserver 8.8.4.4

docker dns change.png

After making this change, i was able to successfuly login to docker hub from the terminal.